Changing an adult diaper in bed is a common but sensitive task for family caregivers of bedbound seniors. This practical guide teaches safe preparation, step-by-step in-bed techniques for dependent adults, skin care and pressure injury prevention, and answers common questions. Follow dignity-centered methods, infection-control measures, and clear monitoring routines to keep your loved one comfortable and healthy at home.
Preparation and safety before you begin
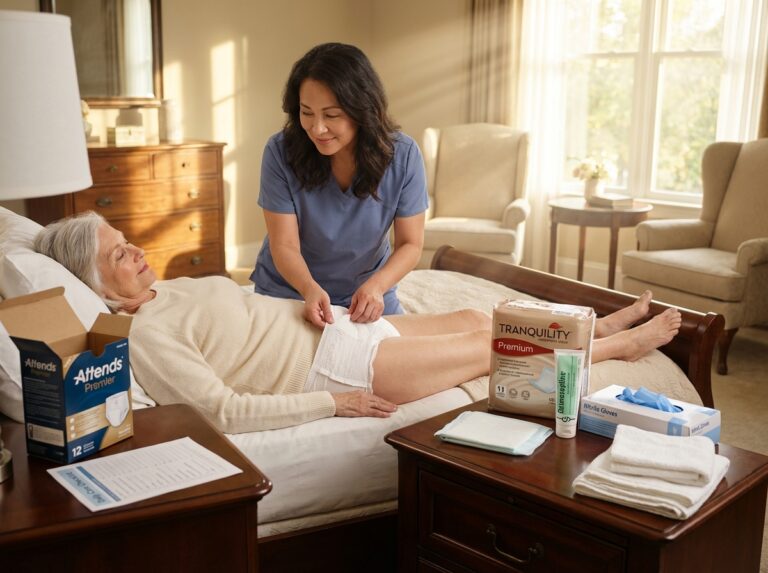
Changing a diaper in bed is a task that requires more than just physical effort. It demands a high level of emotional intelligence and careful planning. Before you even touch a clean brief, you must focus on the person in the bed. Dignity is the most important part of this process. Many seniors feel a deep sense of shame or loss of control when they can no longer manage their own hygiene. You can ease this by asking for permission before you start. Even if the person has cognitive decline, explain every step in a calm voice. Tell them you are going to help them get clean and dry. Use a large towel or a top sheet to keep their upper body and legs covered. Only expose the areas you are actively cleaning. This simple act of keeping them covered preserves their modesty and keeps them warm.
Privacy is another non-negotiable factor. Close the bedroom door and pull the curtains. If you are in a shared space, use a portable screen. You want the environment to feel safe and private. Lighting should be bright enough for you to see the skin clearly. You need to check for redness or sores. However, avoid harsh overhead lights that might hurt the eyes of someone lying flat on their back. A soft bedside lamp that provides clear visibility is often the best choice.
Your own physical safety is just as vital as the comfort of the person you care for. Caregiver burnout often starts with a back injury. If the bed is adjustable, raise it to a height that allows you to work without hunching over. Your waist should be roughly level with the bed surface. If the bed is low and cannot be moved, try kneeling on a cushion instead of bending at the waist. Use pillows to support the person when you turn them. Practicing the log-roll technique is essential. This involves turning the person as one solid unit rather than pulling on their arms or legs. This protects their joints and your muscles.
Preparation means having every single item within arm’s reach. You should never leave a bedbound person alone in the middle of a change to go find a wipe.
| Category | Required Supplies |
|---|---|
| Incontinence Products | Correct size adult briefs with tabs, pull-ups, or adjustable styles. |
| Skin Care | Fragrance-free wipes, mild skin cleanser, washcloths, and moisturizer. |
| Protection | Barrier cream or zinc oxide ointment to prevent rashes. |
| Bedding | Disposable underpads (chux), clean linens, and a slide sheet. |
| Safety/Hygiene | Disposable gloves, hand sanitizer, and trash bags for disposal. |
Choosing the right product is a major part of the preparation. Adult briefs with adjustable tabs are usually the best choice for bedbound individuals. They allow you to get a snug fit without having to pull a garment over the legs. Pull-up styles are better for those who can stand or assist with the process. Make sure the size is correct. A diaper that is too small will pinch the skin and cause sores. One that is too large will leak.
Infection Control Measures
Cleanliness prevents the spread of bacteria and protects both you and the senior. Always wash your hands with warm water and soap before you put on your gloves. Use a fresh pair of gloves for every change. If the diaper is heavily soiled, you might even need to change gloves halfway through the process to avoid cross-contamination. Once the change is finished, seal the soiled diaper and wipes in a disposable bag immediately. Take the trash out of the room right away to manage odors and maintain a sanitary environment. Finish by washing your hands again after the gloves are removed.
Ergonomics and Room Setup
Clear the area around the bed so you have plenty of room to move. If the person is heavy or has limited mobility, do not attempt the change alone. A second caregiver can help hold the person steady while you clean and position the new diaper. Use a slide sheet or a draw sheet to help reposition the person in the center of the bed. This reduces friction on their skin and prevents you from straining your shoulders. If the person is very heavy, a mechanical lift (such as a Hoyer lift) may be necessary to ensure safety. If the person has a fractured hip or recent surgery, you must follow specific medical instructions for moving them. In these cases, a “no-lift” policy is often required to prevent further injury.
When to Call for Professional Help
There are times when home care reaches its limit. If the person becomes combative or extremely agitated during changes, you may need professional advice on how to manage their behavior safely. If the person is very obese, attempting to turn them alone can lead to serious injury for both of you. Always seek help if the person has spinal precautions or a recent surgery that requires specialized handling. If you notice deep sores, bleeding, or signs of infection like a fever, contact a doctor immediately. More than 25 million adults in the US have incontinence, and many of them require professional home health support at some point.
Legal and Insurance Considerations
In the United States, documenting your care is a smart habit. Keep a simple log of when changes happen and the condition of the skin. This information is very helpful for doctors and home health nurses. It also provides a record if you ever need to apply for increased insurance coverage. Medicare Part B typically does not cover over-the-counter incontinence supplies, though some Medicare Advantage plans offer supplemental benefits. Medicaid, however, often covers these supplies if they are deemed medically necessary. You should check your specific policy to see if a doctor’s prescription can help offset the costs. Many families find that documenting the frequency of incontinence helps prove the need for these benefits.
Focusing on these preparation steps makes the actual changing process much smoother. When you have the right tools and a safe environment, you can focus on the person rather than the mess. This approach builds trust and ensures that the senior feels cared for rather than just managed. Taking the time to set up correctly is the best way to prevent skin breakdown and maintain a high standard of care at home.
Step-by-step in-bed changing technique for dependent adults
Effective Communication and Initial Setup
Establishing Consent
Before you begin the physical process of changing a diaper, you must talk to the person. Even if they have advanced dementia or seem unresponsive, explain every movement. Tell them you are going to help them get clean and comfortable. This simple act preserves their dignity. It also reduces the chance of a startle reflex or combativeness. Ensure the room is warm. Close any windows or doors to prevent drafts. Turn on bright overhead lights so you can see the skin clearly. Position the bed at a height that protects your back. This usually means the top of the mattress is at your hip level. Lower the side rail on the side where you are standing. Keep the opposite rail up for safety.
Preparing the Bed Surface
Slide the top covers down to the person’s knees. Use a bath blanket or a large towel to cover their upper body and pelvic area. This keeps them warm and maintains privacy. Gently slide a clean absorbent underpad beneath their hips. If the person can assist, ask them to bend their knees and lift their buttocks. If they are unable to move, you will place the pad during the turning process. Having a clean surface ready prevents the bed linens from getting soiled during the change. This saves time and reduces the physical strain of a full linen change later.
The Supine Technique for Partially Mobile Adults
Loosening and Initial Cleaning
The supine method works best for individuals who can follow simple commands. It is also useful if the person can provide some resistance with their legs to help lift their midsection. Start by unfastening the plastic tabs on both sides of the diaper. Fold the tabs back onto themselves so they do not stick to the person’s skin. Pull the front half of the diaper down between their legs. If there is only urine, you can use the dry parts of the inner lining to pat the skin. For bowel movements, use the front of the diaper to gently wipe away the bulk of the waste as you fold it inward. This keeps the mess contained within the soiled brief.
Sliding the Clean Brief
Ask the person to bend their knees and plant their feet firmly on the mattress. Encourage them to lift their hips toward the ceiling. While they are lifted, slide the soiled diaper out from under them. Quickly wipe the perineal area from front to back. Use a fresh wipe for every stroke. Once the skin is clean, slide a new, unfolded diaper under their hips. Ensure the back of the diaper reaches the small of their back. Ask them to lower their hips. Pull the front of the diaper up between their legs. Smooth out any bunches or folds in the fabric. Fasten the tabs securely but leave enough room for two fingers to fit under the waistband.
The Lateral Turn Method for Dependent Care
Executing a Safe Log Roll
For people who are fully dependent, the log roll is the standard for safety. This technique treats the body as a single unit to protect the spine. Cross the person’s arms over their chest. Bend the knee furthest from you. Place one of your hands on their shoulder and the other on their hip. Gently roll the person toward you. If the person is heavy, use a draw sheet to assist the turn. A second caregiver can stand on the opposite side to support the person while you work. This prevents the person from rolling back or falling. It also allows you to use both hands for cleaning and skin care.
Cleaning the Posterior and Applying Protection
While the person is on their side, roll the soiled diaper inward toward their spine. This traps the waste inside. Use disposable washcloths and a mild, no-rinse cleanser to clean the buttocks and the anal area. Always move from the clean areas toward the soiled areas. Use a gentle patting motion to dry the skin. Moisture trapped in skin folds leads to breakdown. Apply a generous layer of barrier cream or emollient to any areas that show redness. Once the skin is prepared, tuck the clean diaper under the soiled one. Roll the person back over the hump of the two diapers. Move to the other side of the bed to pull the clean diaper through and remove the soiled one.
Managing Bowel Incontinence and Hygiene
Stool Removal and Splash Protection
Bowel movements require a more intensive cleaning process. Use thick, fragrance-free wipes or warm washcloths with a pH-balanced soap. Remove as much fecal matter as possible with the first few wipes. Change your gloves immediately if they become heavily soiled. This prevents the spread of bacteria to other parts of the body or the bed. If the stool is liquid, work slowly to avoid splashes. You can place a small towel between the legs to catch any runoff. Ensure you clean deep into the skin folds and the groin area. Bacteria left on the skin can cause painful rashes or infections within hours.
Urinary Changes and Moisture Control
Urinary-only changes might seem simpler, but they require the same level of attention to drying. Urine changes the pH of the skin and makes it more susceptible to damage. Even if the skin looks dry, use a soft towel to pat the area. Do not use talcum powder. It can cake and cause irritation or respiratory issues. Focus on the areas where the diaper elastic touches the skin. These spots often trap sweat and moisture. If the person uses a catheter, be careful not to tug the tubing. Ensure the catheter is secured to the leg with a stat-lock or medical tape. This prevents the tube from pulling on the bladder neck during the turn.
Final Positioning and Safety Checks
Reducing Friction and Shear
When you move a person in bed, their skin can rub against the sheets. This friction causes shear, which leads to deep tissue damage. To minimize this, always lift the person rather than sliding them. Use a friction-reducing slide sheet if available. Ensure the new diaper is fastened without any wrinkles. A single fold in the plastic or fabric can create a pressure point. Check that the leg cuffs are pulled outward. If the cuffs are tucked inward, they will cause leaks and skin irritation. Smooth the bed linens under the person until they are perfectly flat.
Post-Change Comfort
After the change is complete, return the person to a safe and comfortable position. This might involve elevating the head of the bed or placing pillows under their knees. Make sure the call bell is within their reach. Replace the top covers and ensure they are not too tight around the feet. Check all tubing and lines one last time. Ensure nothing is kinked or trapped under the person’s body. Wash your hands thoroughly after removing your gloves. Document the time of the change and the condition of the stool or urine. This information is vital for the medical team to track hydration and digestive health.
Skin care monitoring and pressure injury prevention after a change
The moment you finish cleaning and drying the skin is the most important time for a thorough inspection. You are already there. The light is usually good. The skin is exposed. This is your chance to spot tiny changes before they become painful wounds. Many caregivers focus only on the change itself. But the skin check is what prevents hospital visits. You should look at every fold and every bony point. Check the tailbone. Check the hips. Look at the heels. These areas take the most weight when a person stays in bed. About 53 percent of homebound older adults deal with incontinence. This means their skin is at constant risk from moisture.
Identifying Skin Issues
Redness and Blanching
Look for red spots that do not belong. Press your finger gently on the red area. If it turns white and then goes back to red, it is still getting blood. This is called blanching. If the spot stays red when you press it, the tissue is damaged. This is a stage one pressure injury. It is a warning sign that you must move the person immediately. Do not let them lie on that spot until the redness is completely gone.
Maceration and Moisture Damage
Maceration looks like skin that has been in a bathtub for too long. It is white. It is soggy. It feels soft or wrinkled. This happens when urine stays against the skin inside a diaper. It makes the skin weak. Weak skin tears easily when you move the person. If you see this, you need to change the diaper more often. You also need a better moisture barrier.
Incontinence Associated Dermatitis (IAD) vs. Fungal Infections
People often confuse IAD with a pressure sore. Incontinence associated dermatitis is a chemical burn from urine or stool. It usually looks like a diffuse, bright red rash that follows the area where the diaper touches the skin. It is painful and stays on the surface. If the rash has satellite lesions (small red dots spreading out from the main rash) or is located in deep skin folds, it may be a fungal infection like Candida. This requires an antifungal treatment, not just a barrier cream. Pressure ulcers are different; they are usually circular, occur over bones, and go deep into the tissue.
Moisture Management Strategies
Using Barrier Creams Correctly
Barrier products are not just lotions. They are shields. Use a zinc oxide paste for heavy protection. Use a petrolatum based ointment for light protection. When you apply these, do not rub them into the skin like a moisturizer. You want to leave a visible layer. Think of it like frosting a cake. If the skin is already red, the layer should be thick enough that you cannot see the skin through it. This is often called the nickel thickness rule. When you change the diaper later, do not scrub the old cream off. Only remove what is soiled. Scrubbing damages the new skin growing underneath.
Avoiding Irritants
Stop using talc or baby powders. These products are outdated. They can clump up when they get wet. These clumps act like sandpaper against the skin. They also do not stop moisture from reaching the skin. Breathable briefs are a better choice. These allow air to move through the fabric. This keeps the skin temperature lower. High heat and moisture together cause the skin to break down much faster. Super absorbent pads are also helpful. They pull the liquid away from the surface and turn it into a gel.
Repositioning and Pressure Relief
The Two Hour Rule
A person who cannot move themselves needs to be turned every two hours. This is a standard rule for a reason. It gives the skin a break. It lets blood flow back into the tissues. You should have a written schedule. Turn them to the left side. Then the back. Then the right side. If the person is at very high risk, you might need to do this more often. Use pillows to keep their knees and ankles from touching. This prevents sores between the joints.
Micro Shifts and Offloading
You do not always have to do a full turn. Micro shifts are small movements that change the pressure point. You can slide a small wedge or a rolled towel under one hip. This tilts the body just thirty degrees. It is enough to move the weight off the tailbone. Use a pressure relieving mattress if possible. These mattresses use air or special foam to spread the body weight evenly. Heel protectors are also vital. The skin on the heels is very thin. A simple foam boot can keep the heels off the bed surface entirely.
Nutrition and Hydration
Building Strong Skin
What the person eats affects how their skin holds up. Protein is the building block for skin. If they do not get enough protein, their skin becomes thin like paper. It will tear during a simple diaper change. Water is just as important. Dehydrated skin loses its stretch. It cracks easily. Make sure they are drinking fluids throughout the day. If they have a wound, they may need extra vitamins like Vitamin C and Zinc. Talk to a doctor about a nutrition plan if you see the skin getting fragile.
Documentation and When to Call for Help
Keeping a Care Log
Write down what you see during every change. Note the time. Note the skin color. Note the actions you took. For example, you might write that the left hip was pink at 10 AM and you applied barrier cream. This log is very helpful for doctors. It shows them how fast a problem is moving. It also helps other family members stay on the same page.
Signs of Infection
You must escalate care if you see signs of infection. Watch for persistent redness that spreads. Look for warmth when you touch the skin. If you see pus or a green discharge, call the primary care provider. A foul odor that stays after cleaning is another red flag. If the person develops a fever or becomes suddenly confused, contact a wound nurse or a doctor immediately. These can be signs that a skin infection has entered the bloodstream. Early intervention saves lives.
Frequently Asked Questions about changing adult diapers in bed
Caregivers often face the same practical challenges every day. While the previous chapters covered the technical steps of changing and skin monitoring, this section addresses specific concerns that arise during the routine. Having a quick reference for these issues helps maintain a high standard of care and reduces the stress of making decisions in the moment.
Common Caregiver Questions and Practical Solutions
How often should I change an adult diaper?
You should check for wetness or soiling every two hours. This schedule is a standard for preventing skin breakdown. If you find that the brief is wet, change it immediately. Leaving a person in a soiled diaper increases the risk of infection. It also causes the skin to soften and tear easily. Some people may need more frequent checks if they take diuretics or have high fluid intake.
Safety Red Flag
If the skin remains wet despite frequent changes, the product may not be absorbent enough.
Suggested Resource
A home health nurse can help you establish a personalized toileting or changing schedule.
How to handle bowel accidents safely?
Bowel accidents require immediate attention to prevent the spread of bacteria. Always wear disposable gloves. Use a large disposable underpad to protect the bed linens. Clean the area from front to back using pH-balanced wipes. This direction is vital for preventing urinary tract infections. Use multiple wipes and discard them after one swipe. Ensure all creases in the skin are clean and dry before putting on a new brief.
Safety Red Flag
Contact a clinician if you notice blood in the stool or if the person has persistent diarrhea.
Suggested Resource
A geriatrician can review the patient’s diet or medications to help manage bowel consistency.
What products reduce odor in a home setting?
Odor management starts with prompt changes. You can use pH-balanced cleansing sprays that neutralize odors instead of just masking them. Specialized diaper disposal bins with charcoal filters or double-sealing lids are very effective. Some caregivers use air purifiers with HEPA and carbon filters in the bedroom. Avoid using heavy perfumes or scented sprays. These can irritate the respiratory system of a bedbound person.
Safety Red Flag
A strong ammonia smell or a foul odor from urine can indicate a urinary tract infection.
Suggested Resource
Local caregiver support groups often share recommendations for the most effective odor-neutralizing brands available locally.
Can I reuse wipes or cloths for cleaning?
It is best to use disposable wipes for hygiene and convenience. Reusing cloths increases the risk of cross-contamination. If you must use washcloths, you must wash them in hot water with bleach after every single use. Never use the same cloth for the genital area and other parts of the body. Disposable wipes are designed to be gentle on the skin while effectively removing waste.
Safety Red Flag
Using a dirty cloth can lead to skin infections or the spread of resilient bacteria like C. diff.
Suggested Resource
Home health aides can demonstrate the most efficient way to use wipes to minimize waste.
When is a catheter better than using briefs?
Catheters are generally reserved for specific medical conditions. These include urinary retention or end-of-life comfort. They are not a substitute for diapers because they carry a high risk of infection. Briefs are usually the safer choice for long-term management at home. According to Urinary Incontinence research from StatPearls, managing the type of incontinence is key to choosing the right product.
Safety Red Flag
If a person cannot void at all or experiences extreme pain, seek medical help immediately.
Suggested Resource
A urologist can determine if a catheter is medically necessary for your relative.
What if the person resists or becomes agitated during a change?
Agitation is common in seniors with dementia. Speak in a calm and low voice. Explain every step before you do it. Give the person a small object to hold to keep their hands busy. Ensure the room is warm and the lighting is soft. If the person becomes combative, stop the process. Wait a few minutes and try again when they are calmer.
Safety Red Flag
Sudden changes in behavior or increased aggression can be a sign of physical pain or a UTI.
Suggested Resource
A geriatric psychiatrist can help manage the behavioral symptoms of dementia.
How to dispose of soiled diapers in a home setting?
Place the soiled brief in a small plastic bag and tie it tightly. You can then place it in a dedicated trash can with a lid. For an environmentally friendly option, look for biodegradable disposal bags. Some companies now offer compostable adult briefs, though these require specific disposal services. Regular trash pickup is usually sufficient if the waste is double-bagged to prevent leaks and odors.
Safety Red Flag
Do not leave soiled diapers in open bins in common living areas. This is a health hazard.
Suggested Resource
Your local waste management office can provide guidelines on disposing of medical or hygiene waste.
Key takeaways checklist and next steps for caregivers
Documentation Prompts
Keeping a log helps you track health changes over time. Use a simple notebook or a digital template. Record the following details after each change.
| Time of Change | Skin Condition | Output Type | Action Taken |
|---|---|---|---|
| 8 AM | Clear and dry | Urine only | Applied barrier cream |
| 12 PM | Slight redness on hip | Bowel movement | Cleaned and repositioned |
| 4 PM | Redness faded | Urine only | Changed diaper |
Signs to Report to a Professional
Some issues require medical attention. Report these signs to a doctor or home health nurse immediately. Look for open sores or skin that looks like a burn. Watch for foul smelling urine or unusual discharge. Note if the person has a fever or seems more confused than usual. These can be signs of a urinary tract infection or a developing pressure ulcer. Early reporting prevents minor issues from becoming serious medical emergencies.
Emotional and Self Care Tips
Caregiving is a demanding role. You must prioritize your own well being to stay effective. Ask for help from other family members. Do not try to do everything alone. Schedule regular breaks for yourself. Access respite services in your community. These services provide temporary care so you can rest. Remember that building confidence takes time. You will become more efficient with practice. Practice patience with yourself and your relative. Maintaining dignity and open communication makes the process easier for both of you.
Next Steps for Problems
If skin breakdown occurs, ask for a referral to a wound care nurse. They can provide specialized dressings and treatment plans. If the person resists care or becomes agitated, talk to a geriatrician. They can suggest strategies to manage behavioral symptoms. You are part of a large community of caregivers. Use the resources available to you. Tracking templates and support groups can reduce the stress of daily care. Your dedication improves the quality of life for your bedbound relative every day.
Maintaining a routine is the key to success. It reduces anxiety for the senior. It creates a predictable workflow for the caregiver.
Tracking Template for Daily Care
Use this simple format to stay organized. You can print this or copy it into a journal.
Date: 12/24/2025
Change 1 Time: ________ Skin Status: ________ Output: ________
Change 2 Time: ________ Skin Status: ________ Output: ________
Change 3 Time: ________ Skin Status: ________ Output: ________
Repositioning Log:
Left Side: ________ Back: ________ Right Side: ________
Notes for Doctor: __________________________________________
Standardized care routines reduce the risk of infection. They also protect the integrity of the skin. Practice these techniques until they feel like second nature. Your efforts make a significant difference in the comfort and safety of your loved one at home.
Sources
- How Common is Urinary Incontinence in Adults? – Aeroflow Urology — More than 25 million adults in the US have incontinence. According to a survey by Aeroflow Urology, 62% of women ages 20 and over have urinary incontinence.
- Urinary Incontinence – StatPearls – NCBI Bookshelf – NIH — Stress urinary incontinence: 24% to 45% in women older than 30 · Urge urinary incontinence: 9% in women aged 40 to 44, 31% in women older than 75 …
- Urinary Incontinence in Women Statistics – Phoenix Physical Therapy — Of the 25 million adult Americans suffering from some form of urinary incontinence, 75-80% of those are women. · Urinary Incontinence affects 200 million people …
- The Impact of Incontinence: Key Statistics and Market Trends to Know — According to the National Institute of Diabetes and Digestive and Kidney Diseases (NIDDK), an estimated 25 million adult Americans experience some form of …
- Demand for Bladder Liners in USA | Global Market Analysis Report — The demand for bladder liners in USA is projected to grow from USD 0.5 billion in 2025 to USD 1.0 billion by 2035, at a CAGR of 5.9%.
- Understanding Female Bladder Leakage: Causes, Types, and … — Older Adults: Women over 50 have the highest incidence rates, with up to 75% of women over 65 reporting bladder leakage. Studies show that women …
- Incontinence – United States | Statista Market Forecast — The average volume per person in the Incontinence market is projected to be 1.2kg units in 2025. The United States has seen a rise in demand for eco-friendly …
- Association of Chronic Conditions With Bladder Health in Women — Overall, less than 10% of the cohort reported urgency and less than 10% reported stress urinary incontinence at least 50% of the time in the …
Legal Disclaimers & Brand Notices
The content provided in this article is for informational purposes only and does not constitute professional medical advice, diagnosis, or treatment. Always seek the advice of a physician or other qualified health provider with any questions you may have regarding a medical condition, specific medical procedures, or the clinical management of a patient. Never disregard professional medical advice or delay in seeking it because of something you have read in this article.
All product names, logos, and brands mentioned in this text are the property of their respective owners. All company, product, and service names used are for identification purposes only. Use of these names, logos, and brands does not imply endorsement or affiliation.